> ## Documentation Index
> Fetch the complete documentation index at: https://docs.getoutbox.ai/llms.txt
> Use this file to discover all available pages before exploring further.
# Subaccounts & Rebilling
> Manage companies, users, and automated billing for your clients
## Overview
The Agency Settings allows you to create and manage multiple company accounts under one umbrella. Each company gets its own isolated environment with separate agents, billing, and user permissions.
## Company Management
In the **Agency Settings**, click **Companies** on the sidebar to access the company management dashboard.
### Creating a Company
Navigate to the **Companies** tab in your Agency Settings.
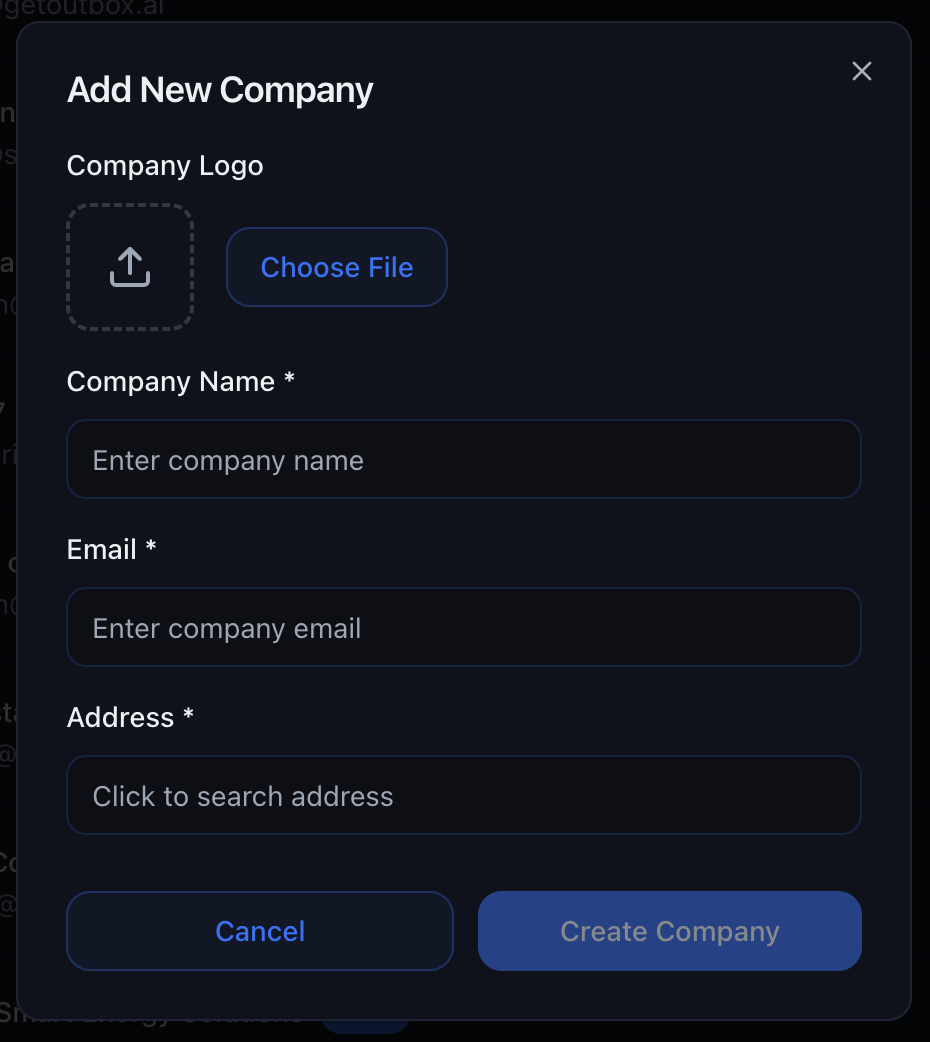
Click **Create a company** and fill in the details: - Upload a logo - Set
company name - Enter e-mail address - Add postal address
Agency Starter supports up to 3 companies, Growth supports up to 10
companies, and Scale supports unlimited companies.
 ### Suspend or Delete
* **Suspend** – Freeze access to the company account temporarily
* **Delete** – Remove the tenant entirely with one click
Deleting a company is permanent and cannot be undone. All agents, data, and
settings will be lost.
## User Management
### Company-Level Users
Grant team members access to individual company accounts with role-based permissions.
Navigate to **Settings → Company** within the company workspace.
Scroll down to the **Company Staff** section.
Enter the user's e-mail and select a role: - **Viewer** – View transcripts
and analytics (read-only) - **Editor** – Viewer rights plus edit prompts,
tools, and agent settings - **Creator** – Editor rights plus create new
agents - **Admin** – Full access including phone numbers, billing, and
integrations
Click **Invite**. The user receives an e-mail link to create their password.
### Agency-Level Admins
Agency admins have full rights over all company accounts under the agency.
Ensure you're in the Agency Settings (not a company workspace).
Go to **Settings → Agency Admins**.
Enter an e-mail address and click **Invite**.
Agency Admins inherit full rights over all company accounts under that agency.
## Custom Fields & Custom Values
Custom Fields and Custom Values allow you to extend your company settings with additional data that can be referenced in your agent prompts.
### Custom Fields
Custom Fields are fields that can be assigned to contacts. When contacts are uploaded or created, these custom fields can be set and then referenced in agent prompts using dynamic variables.
**Use Cases:**
* Store contact-specific information like membership type, lead source, or referral code
* Track custom attributes that aren't part of standard contact fields
* Personalize agent conversations based on contact-specific data
**How to Use:**
1. **Create Custom Fields:**
* Navigate to **Settings → Company** within your company workspace
* Find the **Custom Fields** section
* Add new custom fields with names like `membership_type`, `lead_source`, `referral_code`, etc.
2. **Assign to Contacts:**
* When uploading contacts via CSV or API, include your custom field values
* Custom fields can also be set when creating contacts programmatically
3. **Reference in Agents:**
* Use the format `{{contact.custom_field_name}}` in your prompts
* Example: `"Hi {{contact.first_name}}, I see you're interested in our {{contact.membership_type}} membership."`
Custom Fields are perfect for storing data that varies per contact, like membership tiers, appointment preferences, or custom tags.
### Custom Values
Custom Values are company-specific values that can be set once and referenced across all your agents. This allows you to update company-wide information in one place rather than updating every agent individually.
**Use Cases:**
* Company address, phone number, or business hours
* Standard pricing or service descriptions
* Company-wide policies or messaging
* Any information that should be consistent across all agents
**How to Use:**
1. **Create Custom Values:**
* Navigate to **Settings → Company** within your company workspace
* Find the **Custom Values** section
* Add new custom values with names like `company_address`, `business_hours`, `support_email`, etc.
2. **Set the Values:**
* Enter the value for each custom value field
* These values are shared across all agents in your company
3. **Reference in Agents:**
* Use the format `{{company.custom_value_name}}` in your prompts
* Example: `"Our office is located at {{company.company_address}}. Would you like directions?"`
**Best Practice:** If your company address changes, update it once in Custom Values rather than editing every agent prompt. All agents will automatically use the new address!
**Example:**
If you set a custom value called `company_address` with the value `"123 Main Street, Perth, WA 6000"`, you can reference it in any agent prompt:
```markdown theme={null}
You are a receptionist for {{company.name}}.
Our office is located at {{company.company_address}}.
When customers ask for directions, provide this address.
```
If you later move to a new location, simply update the `company_address` custom value once, and all your agents will automatically use the new address.
***
## Billing & Usage
Track usage and profitability for each company account.
## SaaS Plans & Self-Serve Signup
Create reusable SaaS plans that clients can subscribe to without manual setup.
Automated SaaS Plans are available on **Growth** and **Scale** plans. If you
need this feature, upgrade to **Growth**.
### Create a SaaS Plan
In **Agency Settings → SaaS Plans**, you can define a packaged offer with:
* **Monthly Price**
* **Free Trial Days**
* **Included Credits**
* **Chat Rate**
* **Call Rate**
* **Jarvis Multiplier**
* **Agents Allowed**
* **Websites Allowed**
### Share Signup Link
After saving a plan, copy its signup link and assign it to a website. Prospects
can then self-onboard end to end: account creation, plan selection, and billing
setup.
Use one signup link per offer (for example, "Starter", "Growth", "Pro") so
your website CTAs map directly to the correct plan.
### Add Clients Manually (Alternative)
If you onboard clients manually, you can still create them directly and set
custom values per client:
* **Rebill Option**
* **Chat Rate**
* **Call Rate**
* **Jarvis Multiplier**
* **Agent Limit**
* **Website Limit**
* **Concurrent Lanes**
### Stripe Wallet (Recommended)
Stripe Wallet is the newest rebilling method and is the default recommendation for most agencies.
Wallets are created **under your agency’s Stripe account** for each client (subaccount). You save the client’s card on file; **usage draws the wallet down**, and the card is **charged to top the wallet back up** as they consume chat and voice. You can also **add or remove complimentary credits** from the subaccount controls when you want to comp usage or adjust balances.
Automated Stripe rebilling is available on **Growth** and **Scale** plans. If
you need automated Stripe rebilling, upgrade to **Growth**.
**What it covers automatically:**
* Chat usage
* Voice/call usage
### Hide Billing
New **Hide Billing** toggle lets you hide call/chat costs from company users. This is useful when you want to keep internal margins private while still giving clients access to the rest of the platform.
**Where to find it:** **Settings → Company → Billing**
### Usage Dashboard
View detailed metrics for each subaccount:
* **Cost** – How much the usage cost your agency
* **Revenue** – How much you charged the client
* **Profit** – Your margin (Revenue - Cost)
This gives you full visibility into which clients are most profitable and helps with pricing optimization.
### Complimentary Credits
You can add or remove complimentary credits for any client from that client’s subaccount menu (where the other subaccount stats and controls are managed).
Use this to grant temporary credits for onboarding, promotions, service recovery, or one-off goodwill adjustments.
## Advanced Rebilling Settings
Configure automated billing rules for each company account.
### Suspend or Delete
* **Suspend** – Freeze access to the company account temporarily
* **Delete** – Remove the tenant entirely with one click
Deleting a company is permanent and cannot be undone. All agents, data, and
settings will be lost.
## User Management
### Company-Level Users
Grant team members access to individual company accounts with role-based permissions.
Navigate to **Settings → Company** within the company workspace.
Scroll down to the **Company Staff** section.
Enter the user's e-mail and select a role: - **Viewer** – View transcripts
and analytics (read-only) - **Editor** – Viewer rights plus edit prompts,
tools, and agent settings - **Creator** – Editor rights plus create new
agents - **Admin** – Full access including phone numbers, billing, and
integrations
Click **Invite**. The user receives an e-mail link to create their password.
### Agency-Level Admins
Agency admins have full rights over all company accounts under the agency.
Ensure you're in the Agency Settings (not a company workspace).
Go to **Settings → Agency Admins**.
Enter an e-mail address and click **Invite**.
Agency Admins inherit full rights over all company accounts under that agency.
## Custom Fields & Custom Values
Custom Fields and Custom Values allow you to extend your company settings with additional data that can be referenced in your agent prompts.
### Custom Fields
Custom Fields are fields that can be assigned to contacts. When contacts are uploaded or created, these custom fields can be set and then referenced in agent prompts using dynamic variables.
**Use Cases:**
* Store contact-specific information like membership type, lead source, or referral code
* Track custom attributes that aren't part of standard contact fields
* Personalize agent conversations based on contact-specific data
**How to Use:**
1. **Create Custom Fields:**
* Navigate to **Settings → Company** within your company workspace
* Find the **Custom Fields** section
* Add new custom fields with names like `membership_type`, `lead_source`, `referral_code`, etc.
2. **Assign to Contacts:**
* When uploading contacts via CSV or API, include your custom field values
* Custom fields can also be set when creating contacts programmatically
3. **Reference in Agents:**
* Use the format `{{contact.custom_field_name}}` in your prompts
* Example: `"Hi {{contact.first_name}}, I see you're interested in our {{contact.membership_type}} membership."`
Custom Fields are perfect for storing data that varies per contact, like membership tiers, appointment preferences, or custom tags.
### Custom Values
Custom Values are company-specific values that can be set once and referenced across all your agents. This allows you to update company-wide information in one place rather than updating every agent individually.
**Use Cases:**
* Company address, phone number, or business hours
* Standard pricing or service descriptions
* Company-wide policies or messaging
* Any information that should be consistent across all agents
**How to Use:**
1. **Create Custom Values:**
* Navigate to **Settings → Company** within your company workspace
* Find the **Custom Values** section
* Add new custom values with names like `company_address`, `business_hours`, `support_email`, etc.
2. **Set the Values:**
* Enter the value for each custom value field
* These values are shared across all agents in your company
3. **Reference in Agents:**
* Use the format `{{company.custom_value_name}}` in your prompts
* Example: `"Our office is located at {{company.company_address}}. Would you like directions?"`
**Best Practice:** If your company address changes, update it once in Custom Values rather than editing every agent prompt. All agents will automatically use the new address!
**Example:**
If you set a custom value called `company_address` with the value `"123 Main Street, Perth, WA 6000"`, you can reference it in any agent prompt:
```markdown theme={null}
You are a receptionist for {{company.name}}.
Our office is located at {{company.company_address}}.
When customers ask for directions, provide this address.
```
If you later move to a new location, simply update the `company_address` custom value once, and all your agents will automatically use the new address.
***
## Billing & Usage
Track usage and profitability for each company account.
## SaaS Plans & Self-Serve Signup
Create reusable SaaS plans that clients can subscribe to without manual setup.
Automated SaaS Plans are available on **Growth** and **Scale** plans. If you
need this feature, upgrade to **Growth**.
### Create a SaaS Plan
In **Agency Settings → SaaS Plans**, you can define a packaged offer with:
* **Monthly Price**
* **Free Trial Days**
* **Included Credits**
* **Chat Rate**
* **Call Rate**
* **Jarvis Multiplier**
* **Agents Allowed**
* **Websites Allowed**
### Share Signup Link
After saving a plan, copy its signup link and assign it to a website. Prospects
can then self-onboard end to end: account creation, plan selection, and billing
setup.
Use one signup link per offer (for example, "Starter", "Growth", "Pro") so
your website CTAs map directly to the correct plan.
### Add Clients Manually (Alternative)
If you onboard clients manually, you can still create them directly and set
custom values per client:
* **Rebill Option**
* **Chat Rate**
* **Call Rate**
* **Jarvis Multiplier**
* **Agent Limit**
* **Website Limit**
* **Concurrent Lanes**
### Stripe Wallet (Recommended)
Stripe Wallet is the newest rebilling method and is the default recommendation for most agencies.
Wallets are created **under your agency’s Stripe account** for each client (subaccount). You save the client’s card on file; **usage draws the wallet down**, and the card is **charged to top the wallet back up** as they consume chat and voice. You can also **add or remove complimentary credits** from the subaccount controls when you want to comp usage or adjust balances.
Automated Stripe rebilling is available on **Growth** and **Scale** plans. If
you need automated Stripe rebilling, upgrade to **Growth**.
**What it covers automatically:**
* Chat usage
* Voice/call usage
### Hide Billing
New **Hide Billing** toggle lets you hide call/chat costs from company users. This is useful when you want to keep internal margins private while still giving clients access to the rest of the platform.
**Where to find it:** **Settings → Company → Billing**
### Usage Dashboard
View detailed metrics for each subaccount:
* **Cost** – How much the usage cost your agency
* **Revenue** – How much you charged the client
* **Profit** – Your margin (Revenue - Cost)
This gives you full visibility into which clients are most profitable and helps with pricing optimization.
### Complimentary Credits
You can add or remove complimentary credits for any client from that client’s subaccount menu (where the other subaccount stats and controls are managed).
Use this to grant temporary credits for onboarding, promotions, service recovery, or one-off goodwill adjustments.
## Advanced Rebilling Settings
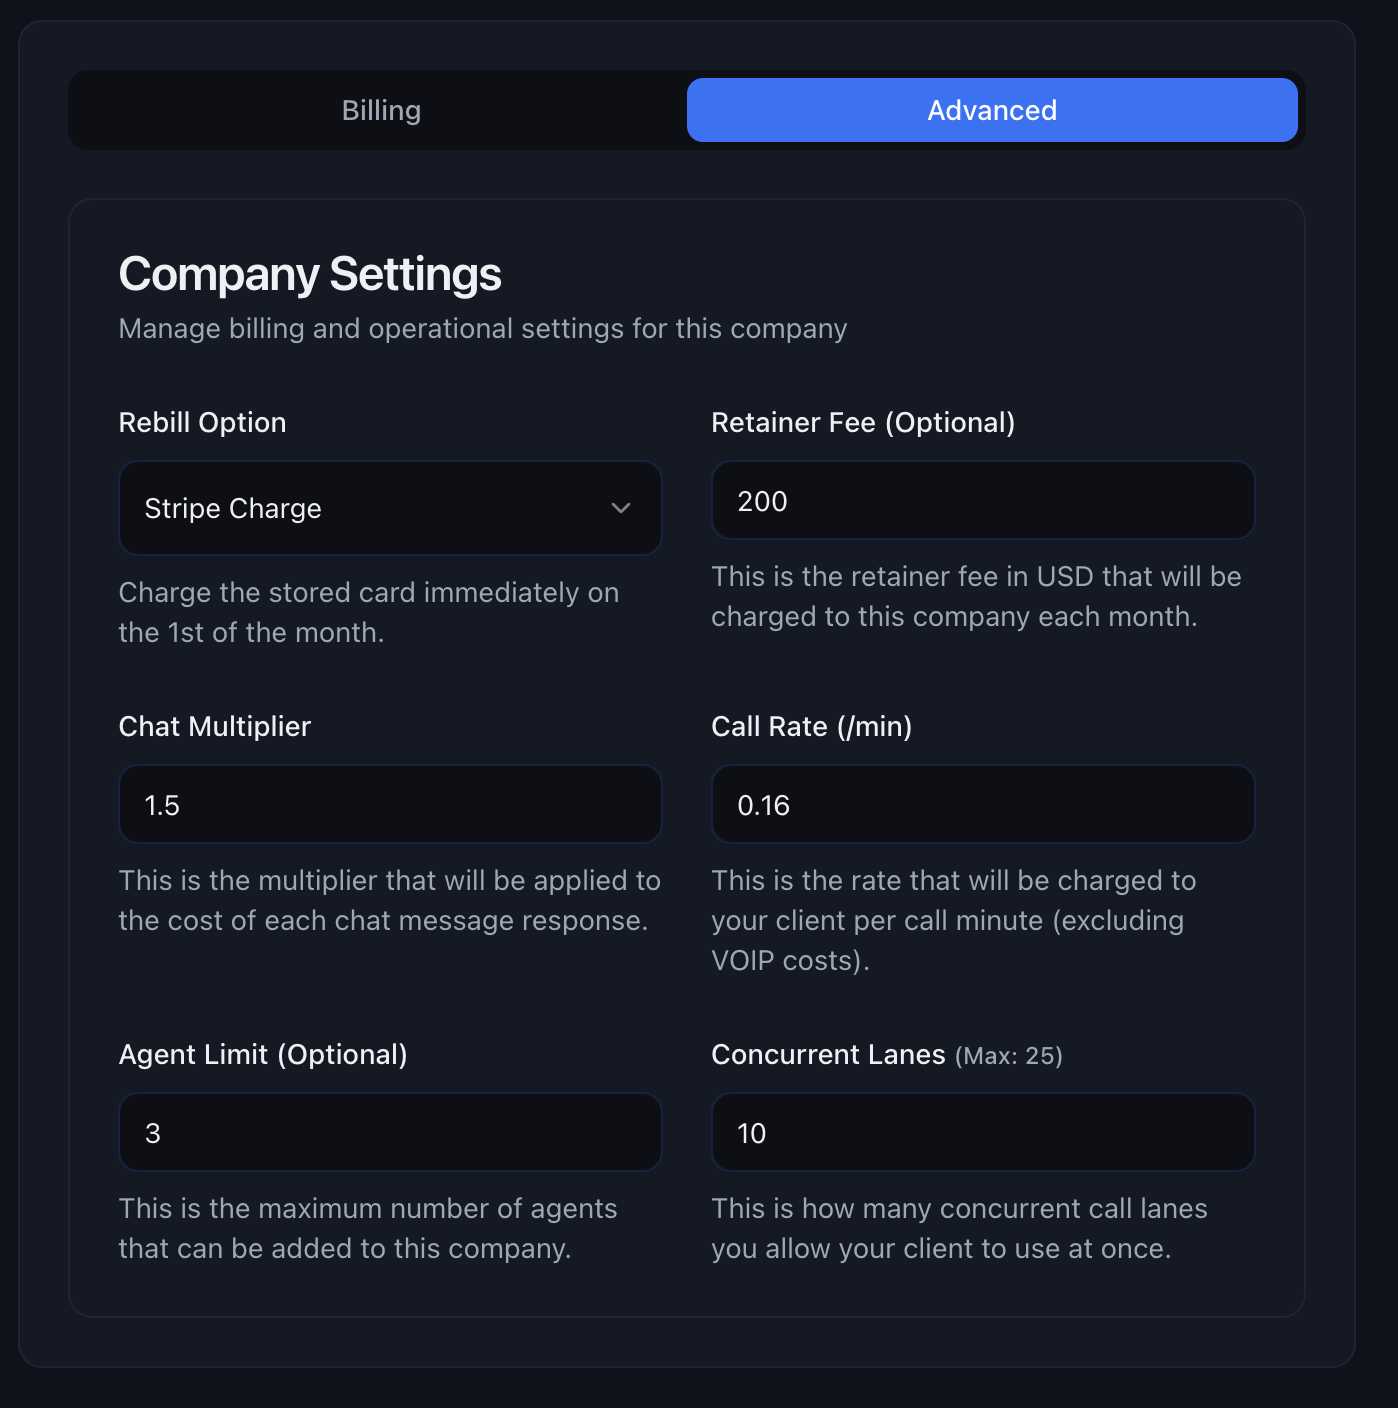
Configure automated billing rules for each company account.
 ### Rebill Option
Toggle rebilling on or off for the company. When off, you'll need to bill the client manually.
### Retainer Fee (Optional)
```
Retainer Fee: $0.00 USD/month
```
Set a fixed monthly fee that will be charged to this company each month, regardless of usage.
### Chat Rate
```
Chat Rate: From Agency Company Settings
```
Set the chat usage rate charged to this specific client. You can keep a default
agency value or override it per client when needed.
### Call Rate (per minute)
```
Call Rate: $0.16/min
```
The rate charged to your client per call minute (excluding VOIP provider costs). This is your margin on voice calls.
### Jarvis Multiplier
```
Jarvis Multiplier: 1.0x
```
Adjust how JARVIS usage is priced for the client relative to your base rate.
Use this to package higher-touch support tiers or discounted enterprise plans.
### Agent Limit (Optional)
```
Agent Limit: Unlimited
```
Set the maximum number of agents this company can create. Leave empty for unlimited agents.
### Website Limit (Optional)
```
Website Limit: Unlimited
```
Set the maximum number of websites this client can create or connect. Leave
empty for unlimited websites.
### Concurrent Lanes
```
Concurrent Lanes: 10 (Starter) / 25 (Growth) / 100 (Scale)
```
Control how many simultaneous calls the client can handle at once. This prevents resource abuse and helps manage infrastructure costs.
## JARVIS
JARVIS is an AI operations assistant that can be turned on or off per subaccount.
**Where to find it:** **Settings → Company → JARVIS**
### What JARVIS Can Do
* Instantly answer analytics questions across voice + chat
* Find top and bottom conversations by score, duration, status, or timeframe
* Search transcript content (promos, pricing, objections, keywords)
* Pull full thread context for fast QA and debugging
* Detect tool-call failures and show outputs
* Surface workflow insights (list workflows, enrolments, execution logs, failures)
* Calculate cost aggregates (when billing visibility is enabled)
### Enable or Disable JARVIS
Use the JARVIS toggle in subaccount settings:
* **Enabled**: users can access JARVIS insights and investigation tools
* **Disabled**: JARVIS is hidden for that subaccount
## Rebilling Options
Choose how you want to collect payment from your clients.
Rebilling is disabled. You'll need to invoice clients manually through your
own system.
{" "}
Automatically charge the client's GoHighLevel Wallet balance.
Only available if you own **GoHighLevel Agency-Pro** with Rebilling enabled.
{" "}
Create a **Stripe Wallet** for each client on **your agency Stripe account**. Their card tops up the wallet as usage runs. Complimentary credits can be added or removed from the subaccount menu.
**Best for:** Agencies that want usage-based billing with automatic top-ups and a single Stripe relationship.
{" "}
Generate an invoice draft that you can review before sending to the client.
**Best for:** Agencies that want to review invoices before they go out.
{" "}
E-mail a final invoice automatically. The client pays manually via Stripe's
payment link. **Best for:** Clients who prefer to review and pay invoices
manually.
{" "}
Automatically charge the stored card on the 1st of each month. **Best for:**
Fully automated billing with reliable clients.
Requires the client to have a valid payment method on file.
Bill the client directly through their own payment method.
**This will break whitelabel functionality.** The client will see Outbox
branding instead of your agency branding.
## Best Practices
Research market rates for AI voice and chat agents. A typical markup is
50-100% on infrastructure costs, but you can charge more based on the value
you provide (custom integrations, dedicated support, etc.).
{" "}
If you're providing ongoing support or maintenance, add a retainer fee. This
creates predictable MRR (Monthly Recurring Revenue) for your agency.
{" "}
For most new clients, Stripe Wallet is the fastest way to automate usage-based
billing for both chat and voice: wallets on your agency Stripe, card top-ups,
and optional complimentary credits. If you need a manual approval flow first,
use Stripe Draft during onboarding and move to Stripe Wallet later.
Don't give unlimited concurrent lanes unless the client has committed to
high-volume usage. Most small businesses need 3-5 lanes, while call centers
might need 10-25.
## Troubleshooting
* Check that the email address is correct - Ask them to check spam/junk
folders - Try resending the invitation - Verify your email service isn't
blocking outbound mail
{" "}
* Ensure the client has a valid payment method on file - Check if their card
has expired - Verify the card has sufficient funds/credit available - Consider
switching to Stripe Invoice mode for manual payment
* Check the date range you're viewing - Verify the call duration calculation
(some providers round up) - Review the chat message count and token usage -
Ensure your chat rates and call rates are set correctly
### Rebill Option
Toggle rebilling on or off for the company. When off, you'll need to bill the client manually.
### Retainer Fee (Optional)
```
Retainer Fee: $0.00 USD/month
```
Set a fixed monthly fee that will be charged to this company each month, regardless of usage.
### Chat Rate
```
Chat Rate: From Agency Company Settings
```
Set the chat usage rate charged to this specific client. You can keep a default
agency value or override it per client when needed.
### Call Rate (per minute)
```
Call Rate: $0.16/min
```
The rate charged to your client per call minute (excluding VOIP provider costs). This is your margin on voice calls.
### Jarvis Multiplier
```
Jarvis Multiplier: 1.0x
```
Adjust how JARVIS usage is priced for the client relative to your base rate.
Use this to package higher-touch support tiers or discounted enterprise plans.
### Agent Limit (Optional)
```
Agent Limit: Unlimited
```
Set the maximum number of agents this company can create. Leave empty for unlimited agents.
### Website Limit (Optional)
```
Website Limit: Unlimited
```
Set the maximum number of websites this client can create or connect. Leave
empty for unlimited websites.
### Concurrent Lanes
```
Concurrent Lanes: 10 (Starter) / 25 (Growth) / 100 (Scale)
```
Control how many simultaneous calls the client can handle at once. This prevents resource abuse and helps manage infrastructure costs.
## JARVIS
JARVIS is an AI operations assistant that can be turned on or off per subaccount.
**Where to find it:** **Settings → Company → JARVIS**
### What JARVIS Can Do
* Instantly answer analytics questions across voice + chat
* Find top and bottom conversations by score, duration, status, or timeframe
* Search transcript content (promos, pricing, objections, keywords)
* Pull full thread context for fast QA and debugging
* Detect tool-call failures and show outputs
* Surface workflow insights (list workflows, enrolments, execution logs, failures)
* Calculate cost aggregates (when billing visibility is enabled)
### Enable or Disable JARVIS
Use the JARVIS toggle in subaccount settings:
* **Enabled**: users can access JARVIS insights and investigation tools
* **Disabled**: JARVIS is hidden for that subaccount
## Rebilling Options
Choose how you want to collect payment from your clients.
Rebilling is disabled. You'll need to invoice clients manually through your
own system.
{" "}
Automatically charge the client's GoHighLevel Wallet balance.
Only available if you own **GoHighLevel Agency-Pro** with Rebilling enabled.
{" "}
Create a **Stripe Wallet** for each client on **your agency Stripe account**. Their card tops up the wallet as usage runs. Complimentary credits can be added or removed from the subaccount menu.
**Best for:** Agencies that want usage-based billing with automatic top-ups and a single Stripe relationship.
{" "}
Generate an invoice draft that you can review before sending to the client.
**Best for:** Agencies that want to review invoices before they go out.
{" "}
E-mail a final invoice automatically. The client pays manually via Stripe's
payment link. **Best for:** Clients who prefer to review and pay invoices
manually.
{" "}
Automatically charge the stored card on the 1st of each month. **Best for:**
Fully automated billing with reliable clients.
Requires the client to have a valid payment method on file.
Bill the client directly through their own payment method.
**This will break whitelabel functionality.** The client will see Outbox
branding instead of your agency branding.
## Best Practices
Research market rates for AI voice and chat agents. A typical markup is
50-100% on infrastructure costs, but you can charge more based on the value
you provide (custom integrations, dedicated support, etc.).
{" "}
If you're providing ongoing support or maintenance, add a retainer fee. This
creates predictable MRR (Monthly Recurring Revenue) for your agency.
{" "}
For most new clients, Stripe Wallet is the fastest way to automate usage-based
billing for both chat and voice: wallets on your agency Stripe, card top-ups,
and optional complimentary credits. If you need a manual approval flow first,
use Stripe Draft during onboarding and move to Stripe Wallet later.
Don't give unlimited concurrent lanes unless the client has committed to
high-volume usage. Most small businesses need 3-5 lanes, while call centers
might need 10-25.
## Troubleshooting
* Check that the email address is correct - Ask them to check spam/junk
folders - Try resending the invitation - Verify your email service isn't
blocking outbound mail
{" "}
* Ensure the client has a valid payment method on file - Check if their card
has expired - Verify the card has sufficient funds/credit available - Consider
switching to Stripe Invoice mode for manual payment
* Check the date range you're viewing - Verify the call duration calculation
(some providers round up) - Review the chat message count and token usage -
Ensure your chat rates and call rates are set correctly